2.4.1 Filtering Search Results
In addition to keyword searches, you can search the entire PODS database by entering optional filters. The Filters area (shown in Figure 21) is to the left of the Results table.
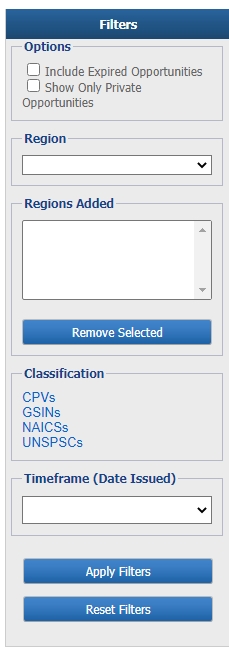
Figure 21: Opportunity Filters
The Filters panel is divided into a number of sections, as follows:
• Options - You can optionally include or exclude two special types of opportunities: Expired and Private. Private opportunities are opportunities you’ve added to PODS yourself and can only be viewed by your company account. They are for your benefit only. See Section 2.6.2 for more information. Expired opportunities can be displayed for informational purposes.
• Region - Select the region(s) for which you want to display opportunities.
• Regions Added - Any filters added from the Region drop-down list will be listed in the Regions Added text box.
To remove a region, select it from the Regions Added box and click the Remove Selected button, which is directly underneath it. Filters are only applied once you click the Apply Filters button at the bottom of the Filters section.
• Classification - Provides a series of opportunity classifications (e.g., product codes) that open in a separate window, allowing for multiple selections.
• CPVs - Check the box(es) for the CPVs for which you want to display opportunities.
• GSINs - Check the box(es) for the GSINs for which you want to display opportunities.
• NAICSs - Check the box(es) for the NAICSs for which you want to display opportunities.
• UNSPSCs - Check the box(es) for the UNSPSCs for which you want to display opportunities.
• Timeframe (Date Issued) - Select a timeframe to constrict the opportunities returned by date issued.
Once all desired filters have been selected, click the Apply Filters button. The Results table will update based on the specified criteria.
To remove the currently defined filters, click the Reset Filters button at the bottom of the Filters area. All filters will be deleted, and the Results table will show all opportunities in chronological order.